minecraft Archives - Stay N Alive

How to Scan Anything You Want Into Minecraft Using Sprout by HP

80599-productsprout-3072432

A couple months ago, I was lucky enough to be one of a few that were selected to receive a Sprout by HP. As part of the criteria, they wanted me to come up with some ideas for cool things I could build and make using the device, which has a 3D scanner built in. I got my Sprout, and I’m loving every bit of it!

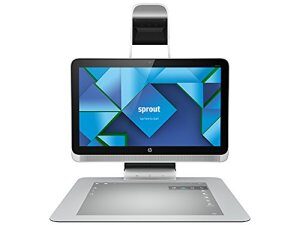
The Sprout by HP comes with a touch mat and scanner, and also has a touch screen. It comes with an optional keyboard and mouse but honestly, especially if you’re a casual computer user you can do most functions without a keyboard or mouse at all!

The scanner points down at the touch mat, and not only projects images onto the touch mat, giving you a second screen to work with, but also scans the touch mat allowing you to select objects and use the touch mat itself as a touch screen. With the Sprout by HP’s scanner you can scan anything from simple paper documents, to 3D images. And if you have the optional and separate 3D Capture Stage, you can scan even more accurate and 360 degree images that you can use for various things like what I’ll show you in this demo. I’ll share an unboxing of the unit in a future, much less formal video.

I wanted to figure out something really cool to do with the computer’s 3D scanning capabilities. My geek friend, Chris Pirillo, suggested I figure out a way to scan things into Minecraft with the 3D scanner. Naturally, since I literally wrote the book – okay, a book, on Minecraft – I thought this was a really cool idea. I’m afraid to admit I wasn’t sure it could be done at the time, but I’m proud to say I figured it out, and it’s actually fairly simple to do!

To do it, you need the Sprout by HP (go buy it now on HP.com or select retail stores!), and just a few software programs that will bring your scanned item into your Minecraft game. Here’s what you need:

  • First, you’ll need a copy of the stable release version of MCEdit. You can download this by going to khroki.github.io/MCEdit-Unified/ and clicking on the button at the top. Make sure you don’t download the development versions, as those do not yet have all the features you need. Once downloaded, you can install the program – I’ll show you how to run it for your purposes later.
  • Next, you need a special script, created by user pepsi_ on minecraftforum.net, that will let you convert the native Sprout by HP 3D scans in .obj file format into MCEdit readable format. I’ve created a downloadable file at www.dropbox.com/s/kn04sr9amy5ntvy/obj2mc.zip?dl=0 – I’ll include a link in the Youtube description and on the blog post about this video. When you download this file just unzip the file and remember where you put it.
Now that you have these things, you get to have some fun! Let’s start by scanning in you item to the Sprout by HP. To do so, tap “3D Capture” on the Touch Mat. You’re going to use the optional 3D Capture Stage which you can purchase at sprout.hp.com for this demo. Select “3D Capture” on the screen, and then choose “Automatic Scan”. You’ll then be prompted to connect your 3D Capture Stage.
Once the Stage is connected, follow the instructions on your screen. You’ll be prompted to scan the background – remove all items from the touch mat and stage, and allow it to scan the background. This prepares the unit for scanning your image.
For my purposes, I like to put the stage in the tilt position. To do so just twist the stage, and place your item. It’s wise to use the supplied sticky tack to hold it in place, as the stage will spin around during the scan. Once your item is in place, you’re ready to scan! Select “Start Scan” and sit back and watch it do it’s work!
Once your scan is done it will prompt you to have the option to do it again. I recommend doing this as often as you need, each time in a different position – on the side, on its’ back, flipped around and so forth until you’ve given the computer every angle you possibly can to develop as accurate a 3D image as possible. When finished, it will save to your hard drive. It will also show up under your 3D scans in the Sprout Workspace to use in other projects.
Now you just need to export the image into a location you can easily access. To do this, with your 3D image open, select the upper-right hand menu and choose “export to obj”. This will allow you to name the file and select where you want to place it – for your purposes you’ll place it on the desktop for ease of access – DON’T FORGET WHERE YOU SAVED YOUR FILE!
Now you’re ready to import your 3D image into Minecraft! This is where the fun starts.
To import your image into Minecraft you’ll use MCEdit. Before you open that though, you need to export the file into a format MCEdit can understand. Remember the obj2mc program from earlier? You just need to run it.
To run the file, just open up the unzipped directory you unzipped earlier. Run the file obj2mc.exe by double-clicking on the file. The program should start running and a new window will pop up with different options. You just need to select your scanned obj file that you just created.
To select the file, select the “…” button in obj2mc. Double-click on the file you just saved on your desktop. And now your file will be loaded!
At this point you can edit any of the options on there. I suggest leaving most of them alone unless you know what you’re doing. Now hit “convert”, and your file will be created in the same place as your original obj file. Let’s import it into MCEdit, which will allow us to choose where in your Minecraft world you want to place your newly scanned item!
First of all, it’s important to note that obj2mc does not scan in color, so your object will be in a gray, generic stone type of Minecraft block. Maybe if someone updates a new program to update these to color, I’ll do another video.
Let’s start by opening MCEdit. Just double-click on the MCEdit executable once you’ve installed the program. Now open up the map from your Minecraft world. Click on “import”, and then select your scanned object. Now place it where you want it to go in your world. Select “save” and your object will now be there when you visit Minecraft!
In future videos, I’ll show you how to upload your Sprout by HP scans onto a Minecraft server so you can share with other friends and never lose your objects. I’ll also show you how to take objects you place or create inside Minecraft itself, and print them out on a 3D printer like the sub $1000 Dremel 3D Idea Builder which works quite well with the Sprout by HP. I will also note that HP sent me one of these to review, which I will share in a future episode.
The Sprout by HP opens up a whole world of possibilities for makers and hackers like myself. I can take practically anything from the real world, import it into the digital, and even produce it back into the real world again in a new, but more creative dimension. My mind has had a mad rush of thoughts and ideas of things that can be scanned, modified, and even printed out using all the different and cool sensors on the machine. I can’t wait to come up with new possibilities and ways to improve on all of this, perhaps maybe even developing a UI inside the Sprout itself to import these into your Minecraft game. The possibilities are endless.
To get the Sprout by HP go to sprout.hp.com. I also suggest the 3D Capture Stage for more accurate 3D images. The Dremel 3D Idea Builder can also be purchased from a link on the HP website, and I’ve had a blast turning my digital creations into physical with the Dremel! A special thanks again to HP for sending me this amazing product.
Now go make things!
Disclosure: HP sent me a Sprout by HP computer, 3D Capture Stage, and Dremel 3D Idea Builder for free, and also sponsored this video and blog post. While that has certainly influenced my excitement, I plan to keep these units and enjoy them for future videos and blog posts which were not sponsored by HP. I really do love this product and plan to share even more in the future! The Sprout by HP is teaching me a lot about where manufacturing and product design is going in the future, one where just about anyone can make things right in their own living rooms!

I’m Writing Minecraft For Dummies, and This Time it’s a Family Affair

493ef-screenshot_060214_010203_am-3499528

Hi, my name is Jesse Stay – I’m writing Minecraft For Dummies and Minecraft Recipes For Dummies, and yes, I’m officially crazy (but loving it!). I guess you could say I’m now addicted to writing books.

When I first started writing my first book, I’m on Facebook–Now What??? with Jason Alba, I thought I was crazy. Then, I started writing FBML Essentials, and I thought I was even crazier. I then wrote Facebook Application Development For Dummies, then Google+ For Dummies, and following that Google+ Marketing For Dummies. We did a Second Edition of I’m on Facebook–Now What???, this time targeting marketers, and following that I wrote the Facebook Development section of Facebook All-in-One For Dummies. That’s 7 books! At this point I think I’m a professional crazy person, and I’m getting pretty used to it.

That’s why I jumped at the chance when talking recently with Wiley to write the full version of Minecraft For Dummies (link to come soon). I’ll also be following that up with Minecraft Recipes For Dummies (also link to come soon), both scheduled to be finished this year. I mean, who can say they actually get paid to use Minecraft? That’s definitely not crazy.

I’m joining up with  the fabulous Youtubers, Team Crafted, on this one, and will include sections from Jacob Cordeiro’s (who I’m told is a very mature 15 years old!) Portable Edition of Minecraft For Dummies. What I’m most excited about though is my 12 year old son Thomas will be writing the majority of the book (his name will be on the cover with me, Team Crafted, and Jacob Cordeiro), with me filling in the gaps, and I’ll also have my 10 year old son Joseph contribute little “tips” here and there (I’m going to suggest to Wiley we call it “Joseph’s Corner”). It will be a book about a game played primarily by kids, written by kids, and an occasional blip or two from me, the adult (I’m also in charge of getting it all in a format consumable by the general public). I’m so excited to bring my kids into the process of writing books with me!

With a movie on the way, entire LEGO sets built on the brand, entire communities built around the game, mods for the game, and new updates coming out to the game weekly, it is a prime time to be publishing this book. Minecraft is truly taking the world by storm, and chances are if you have kids, or you feel like a kid like me, you’re very familiar with the game!

With my previous books all being on social media, the next 2 books will be a fun break for me as I focus on my family, and finally make book writing a family affair. Expect to hear more for me here, as well as on Facebook and Google+ as I make progress! Also, I’m looking for schools and the like that are interested in learning about the book writing process as we write this book – please contact me at [email protected] for further inquiry. I’m also happy to make Comic, Gaming, and Fantasy Con appearances (I can also bring my sons)!

I want to know though – what would you like to learn in a Minecraft book? Go ask your kids. What do they want to learn? As parents, what interests you? Please feel free to share thoughts and ideas in the comments and maybe I’ll find a way to include them in the book.